 When friends visit my home, they often ask where I get my photos framed. The truth is, I do it myself on the cheap. And it’s really easy. Since Calm Cradle doesn’t provide this service right now, I thought I’d offer some basic tips on matting and framing your photos. (Disclaimer: I’m not a designer. I’ve just spent a lot of my life framing photos.)
Supplies
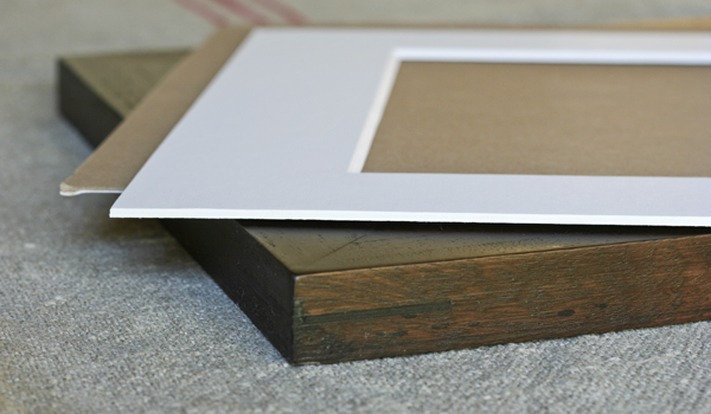
1. Select your photo and placement Always select your photo in conjunction with the space where it will be displayed. Don’t make the mistake of purchasing art that is too small for your wall or shelf; it will look awkward. For fine arts-type photos—and again, this advice depends on the space you have—I generally favor either an 11x14-inch print with a mat that’s outer edges are 16x20 inches, or a 16x20-inch print with a mat that’s outer edges are 20x24 inches. Smaller print sizes, such as 8x10 inches, can work on smaller wall spaces but often seem underdone on larger walls. Purchasing photos in standard sizes, such as those I just mentioned, also makes life easier since you can typically use precut mats and frames. Need some fresh photos? 2. Select a coordinating mat and frame To draw attention to the artwork itself, a simple mat and frame are best. The goal in choosing a mat and frame is to find a combination that makes the photo look “finished” without distracting from the image. These elements should blend with your other décor, not be themselves the focal points. Although you can have a mat cut in any color, I recommend choosing a shade of white, off-white or cream—whichever will make the photo pop and be least distracting in the midst of the rest of your décor. Black can also create a stunning effect, especially with black and white photos, but only if it fits with the rest of your room (say, a room that is mostly black and white with a few colorful accents). See the resources below for inexpensive precut or custom matting. For frames, choose basic colors and textures that blend with elements you’ve already used in the room. For example, if your shelving and tables are dark wood, you may want to go with either a dark brown wood or black frame. If the colors in your room are muted,select a white or a grayish, unfinished wood frame. Check out the resource list below for inexpensive frames. 3. Get matting You will need both a mat and a piece of thick cardboard or foam board backing cut to match the outer dimensions of the mat (and inner dimensions of the frame). You can often use cardboard that comes in the frame or with the mat. The process of securing the photo is one of guess and check. I suppose you could do a lot of measuring to make it exact, but I often want the photo a little off center in one direction or another for the right effect, so I prefer just to eyeball the placement. Place the photo on the backing board, then set the mat on top of it, matching up the outer edges of the mat to the edges of the backing board. Adjust the placement of the photo until you have the portion you want framed in the mat window. Remove the mat and lightly tape the top and bottom of the photo to the backing board. Before you finish the rest of the taping, set the mat on the backing again and place both the mat and backing board into the frame. Secure the back of the frame, then hold the frame up the direction it would hang on the wall. Did gravity shift the mat or backing? Is the photo still correctly aligned? If the photo shifted, remove the tape and reposition it. Put the mat and backing back into the frame and test it again, repeating these steps until the photo is correctly positioned. Once you’re certain the photo is positioned correctly in the mat window, remove the mat once again to finish taping the photo securely to the backing. The trick here is to stretch the photo as flat and tight against the backing as possible so it doesn’t bubble or slip once you have it framed. I typically tape down the corners lightly, then work my way with the tape from the top down the sides and then across the bottom, flattening the photo and adjusting the corner tape as I go. Take the time to start over if necessary—many times even!—to make sure the photo sits flat. It’s worth it. Set the mat onto the backing, making sure you don’t see any tape. If you do see tape, fix it now or you never will. Place the mat and backing into the frame and secure the back of the frame. Hold up the frame and give it a light shake to ensure the photo stays put and doesn’t slip to reveal tape or bubbling. If it stays in place, you’re done! I’ll devote several future blogs to showing how I’ve displayed photos around the house, so stay tuned. Inexpensive resources I don’t like to spend a lot on mats and frames, because there are plenty of places you can purchase them cheaply. Here’s a list of my go-to shops: Michael’s: Precut mats up to 11x14 inches (window size), precut and assembled frames up to large poster sizes, and custom matting and framing. A.C. Moore: Precut mats up to 11x14 inches (window size) and precut and assembled frames up to large poster sizes. Pictureframes.com: Precut and custom mats. You may want to request a hardcopy of their color palette before ordering anything but a white or black mat. You can also purchase custom frames here, though I haven’t tried it. Target: Frames that are a bit more expensive but often include matting. Thrift stores or flea markets: Unique frames (which may require custom matting and/or glass and backing).
2 Comments
9/24/2013 04:19:39 pm
Thank you for posting the great content…I was looking for something like this…I found it quiet interesting, hopefully you will keep posting such blogs… 10/4/2013 08:28:46 pm
Thanks for sharing post on matting and framing basics which is very useful for me and everyone. It contain every detail that I needed Leave a Reply. |
My new book is out! Click to learn more about it.
Hello there
I'm Julia Soplop, writer and photographer. I believe there is something profound in bearing witness to moments of joy and pain in others’ lives. My husband, three girls and I live outside of Chapel Hill, NC. You can read more about me here.
Snag my new photo curriculum for kids!
Categories
All

Popular posts |