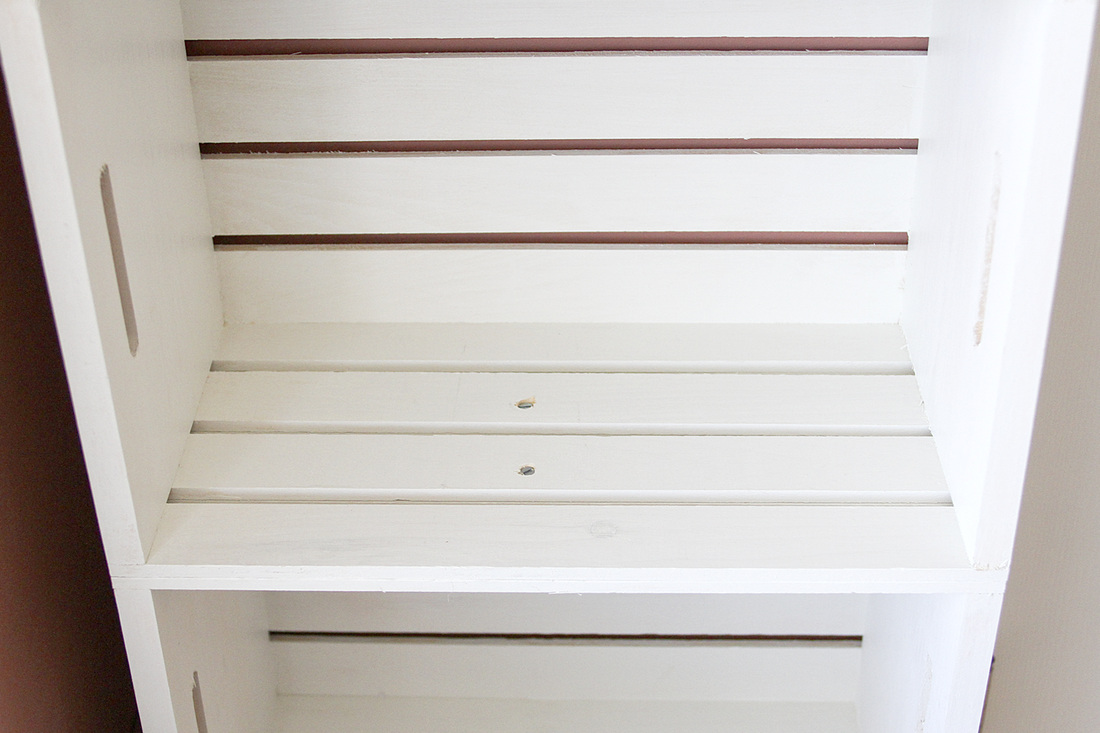
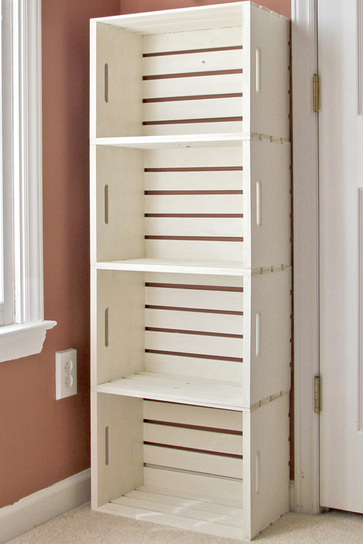
 In working on Cricket's new bedroom, we had trouble finding a bookshelf that fit our space and budget constraints and wasn't made out of some scary, toxic plastic material. So I had the genius idea of buying four unfinished wooden crates from Michael's ($12.99 each), spray painting them white, tacking them together and then bolting them to the wall. The problem with my "simple" DIY construction projects is that while I'm the designer and enforcer, my husband typically gets stuck as the implementer. And because he actually has some knowledge of how to do such things, he always uncovers quite a few flaws in my plans. For example, the spray paint, which I thought would be faster than painting with a brush, failed. Miserably. So he resorted to using several coats of some paint we had left over from a recent bathroom trim project. Then it took multiple iterations of bolts and screws to secure the crates to each other in a way he felt would be safe when Cricket got her hands on them. And then there was the standard debate of how best to anchor the finished shelf to the wall. So the project took a bit more effort on his part than I anticipated, but I kept reminding him along the way that we were saving money by constructing the shelving ourselves. (Somehow the reminders didn't seem to improve the situation.) The undertaking immediately seemed worth the hassle, however, as soon as Cricket saw the shelves in her room and exclaimed, "Oh!" as she ran over to investigate. Now we just have to fill them with her special books and toys. (You can check out the completed toddler bedroom here and the nursery here.) 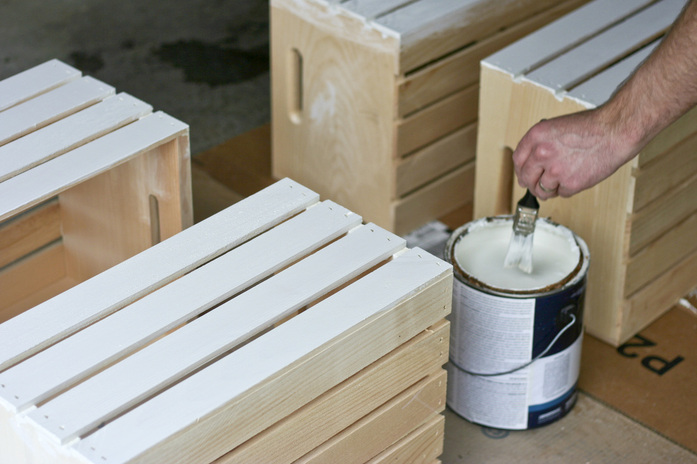 Addendum added 11/25/12: I've had a ton of interest in this bookshelf and was asked for a few more details on how we secured the crates together. I'm sure there are many ways you could do this, but we wanted to make sure it was very, very secure since a toddler would be pulling on it. We stacked the crates, then drilled two holes into the center of the two middle planks of each shelf. (Photo below.) We used 3/4-inch bolts (screw plus nut) to secure the bottom of one crate to the top of the one below it. We made the opening of the holes wide so the top of the screw and the nut on the bottom side could recess into the wood (and not snag). The screws are visible on the shelves, but of course they are covered once you fill the shelves. Need some gift ideas? Check out these simple DIY projects: no-sew tutu, photo plaque, heirloom display and gift tags. You can also view my holiday discounts and nature photo shop.
77 Comments
Joanna
10/21/2012 05:00:53 pm
Fab idea! Did you use acrylic or enamel paint ?
Reply
Dianet Dorsey
10/26/2016 10:02:10 am
Can we use glue instead of the screws?
Connie
11/12/2012 06:29:48 am
What bolts and screws did you end up using? And how did they go in? Thanks, Connie
Reply
Lisa Chaffee
1/24/2021 04:50:42 am
You said you used 3/4 inch bolts but what is the length?
Reply
Yes I would love to know which screws you used as well.
11/17/2012 11:18:32 am
Reply
Danielle
11/19/2012 12:03:15 am
How did you keep the screws from showing?? Is there anyway you could get a close up picture of where you attached them together. I absolutely love this shelf!
Danielle
11/19/2012 12:03:48 am
How did you keep the screws from showing?? Is there anyway you could get a close up picture of where you attached them together. I absolutely love this shelf!! 11/24/2012 08:11:08 am
Sorry to be so slow to respond! Just had family visiting for the holiday but will post more information and a photo tomorrow about the specific screws.
Julia @ Calm Cradle
11/25/2012 12:33:10 am
Just added a few more details. Let me know if you have more questions!
Raven
11/19/2012 01:24:11 pm
Wow, I'm actually doing the same thing, except I am making this a lingerie dresser to put my clothes in. I moved down to Florida with no furniture except a sleeper sofa, so my room mate is letting me borrow hers. I decided it would be cheaper and more move-efficient if I just did a project similar to this to store all my folded clothes in. It's really neat to see you attached the crates together. I'm trying to decide if I should do that, or if I should just unstack and use them to pack clothes/things when it's time to move again next year.
Reply
Marissa
11/25/2012 11:19:04 am
Where did you get the crates at? I love this idea!
Reply
Carolyn Paul
11/27/2012 04:30:36 am
Michael's for $12.99 each.
Reply
Denice Lindsey
11/29/2012 10:08:44 am
I have searching for this sort of thing for my Grandsons room.Micheals here I come.Thank You!
Reply
12/3/2012 12:34:26 am
How did you get it anchored to the wall so it wouldn't toppel over?
Reply
Alyce
2/6/2016 07:55:23 am
Reply
Paula
12/28/2012 08:51:37 pm
This is a wonderful idea and I have already "morphed" it into a variety of other uses....example. I want to lay the crates side by side, I'm thinking 4 will suffice, and attach them to one another the same way Julia did. I will paint them and use them to store shoes and handbags. It will become a piece of "furniture" because it has now become a low, padded bench by incorporating a piece of plywood cut to fit the top and a piece of padding which I will cover with fabric! The top will be secured to the top of crates and voila', a bench/storage unit. So as not to see the contents, I'll turn it facing the foot of my bed or the wall. Happy Crafting!!!
Reply
rosa
1/31/2014 11:49:54 am
Awesome! I'm thinking of doing something similar in my foyer area. I was going to attach 4 side by side and plywood on top to make a cushion seating and shoes or canvas bins to go below the bins. (most likely there will be shoes.
Reply
Veronica
12/29/2012 06:31:38 am
would gluing the crates together not been a better idea? No screw holes and I find carpenters glue great for gluing wood together
Reply
Elena
12/29/2012 04:53:27 pm
If you don't have kids, maybe
Reply
Carolyn
3/12/2013 02:00:28 am
Did using glue on the crates work?
Reply
Cara
1/5/2013 02:00:32 am
I got mine at Joanne's fabrics & used a 40% off coupon each week.
Reply
Amy
4/24/2013 11:32:30 pm
Michaels will take Joann's coupons, 1 per purchase.
Reply
Elbee
4/1/2017 02:27:49 pm
JoAnn's takes competitors coupons also...Michaels, Hobby Lobby, etc. I used the same crates in a shelving unit that Fabric cubes usually go in. They're a bit long, but it actually works very well. I got mine at JoAnns over the course of several weeks...50% off coupons. :)
Michelle
1/7/2013 12:45:11 pm
omg I have been wanting to fix up my daughters room and not only is a great opitins to the typical bookshelf that walmart sells ,but when your'e finished using it as a bookshelf it reuseable for so many other things. Extra bonus when you sign up for the store Micheals email list the send you 40% and even 50% off the regular price.
Reply
tess
1/8/2013 01:07:49 am
Love how your crate project turned out! Can you tell me what the wall paint color is of your room pictured?
Reply
tess
1/8/2013 01:10:48 am
I just looked at your post on your daughters room is the paint Olympic Paint Big Cypress (C26-4).
Reply
Julia @ Calm Cradle
1/8/2013 09:50:32 am
Yes, that's right. Glad you like it! We bought the paint at Lowe's.
Shea
1/21/2013 05:46:54 am
What is the size if the book shelf it self and each crate, I don't need dimensions just compared to a normal household item! In doing 2 of these for some clothes storage in my room
Reply
Kristy
1/21/2013 10:02:48 am
Great idea! I've been looking for an easy, affordable way to build a shelf for my son's room.
Reply
Stacey
1/24/2013 11:02:38 pm
Someone said they got theirs at Jo- Ann's
Reply
Therese
2/19/2015 10:53:26 pm
JoAnn's does have these crates. But I just saw these at Walmart yesterday (2-19-15) for $9.??. I thought of this project immediately. Thanks for the idea!
Eva
2/3/2013 08:38:23 am
What are the dimensions for this?
Reply
2/7/2013 01:54:38 am
if you save some wood dust from other projects and use a little wood glue you can cover the screw heads , a little dry time file down with sand paper or finger nail file.......paint.........perfect!
Reply
Tina
3/1/2013 10:30:47 pm
Great idea! I think I will stain mine instead of painting them and use them for decorative shelving in my living room. Thanks for the idea.
Reply
sandra
3/2/2013 02:19:20 am
I am thinking about doing this but, turning the crates on their sides /laying them down and than adding padding to the top, to create a storage bench. possibly one for my daughters room and one for our living room. Would you say that these are sturdy enough for something like that? I would most likely use 3-4 depending on their measurments.
Reply
Dianna
4/13/2013 07:00:06 am
Awesome idea Sandra!! You have given me food for thought. Never underestimate the power of a group of handy women!
Reply
Nancy
3/15/2013 11:57:29 am
if u want to be able to disassemble and reassemble at a later date I'm thinking firring strips down each side with small screws to secure crates together might wor also
Reply
Dianna
4/13/2013 06:51:09 am
The crates are $11.99 at Joanns and with a 40% off coupon they come up to $7.19 plus tax.
Reply
nic
5/17/2013 01:49:19 pm
Does anyone know how much weight these can hold? Do they feel strong and sturdy?
Reply
Jane
5/20/2013 01:04:36 am
Did you get themin Canada or the states
Reply
Hilary
5/27/2013 01:25:58 pm
I bought these crates at Walmart in Canada for $9.98 each
Reply
7/4/2013 01:48:30 pm
Can i know the cost of this bookshelf and do you provide any discount for it .How many days will you take to deliver it at my home.
Reply
7/21/2013 05:07:13 pm
That was a brilliant idea. Necessity is the mother of invention. You wanted a cheap and non toxic book shelf. People often underestimate the value of simple items around them. In this case a crate. I’am going to build a similar shelf tomorrow.
Reply
michelle
8/28/2013 05:57:47 am
I made a coffee table from these crates and I used dry wall screws and they worked awesome
Reply
9/24/2013 03:50:50 pm
From the last couple of years, the demand of crate furniture has been increasing rapidly and some people are in the habit of making it at home. From bookshelf to coffee table, every furniture is demanded to be in crate shape. For those people who are looking for crate bookshelf and manufacture it at home, your post is pretty awesome and very helpful.
Reply
Tori
9/25/2013 10:57:32 am
Why did the spray-painting not work for you? I plan to spray paint mine, but I won't if it won't work for some reason.
Reply
Nancy
4/8/2016 09:18:16 am
You need to seal the wood before painting. I suggest walmart has spray sealer at a good price. 1 or 2 coats depending how old the wood is. Follow with spray paint of any color. I suggest. Spray paint because crates are made with rough wood.
Reply
10/2/2013 03:45:31 pm
Pretty! This was an extremely wonderful post. Thanks for supplying this info.
Reply
Maria
10/5/2013 09:36:36 pm
Love this idea! I have been looking for something like this for my granddaughter's room. I understand how you attached the crates to each other , but how did you attach to the wall? Can they be ordered on Michaels website? Thanks for such a wonderful idea!!
Reply
Suzanne
11/13/2013 11:31:47 pm
I used crates to make a bedside table after finding cheap fiberboard tables costing $89 on up....ridiculous. I used three crates on their side which brought the table up to the level of the mattress top. I used spray paint (Rustoleum Paint & Primer Satin) and had no problem at all. It did take a couple of coats but looks great. To cover the screws, they sell all sizes of "plugs" that you can put in the screw holes if you recess them a bit.
Reply
Sandra Brooks McCravy
5/31/2014 03:25:19 am
I want to do this! Thanks for the idea!
Reply
8/20/2014 05:53:03 pm
Hi,
Reply
Lisa Landon
4/3/2015 03:45:40 pm
Reply
Betty
10/1/2015 07:14:11 pm
I've made a few short bookshelves with these crates but need to make a 6-9 crate modular bookshelf for my boys' shared room and all their books.
Reply
Rachael
11/14/2015 06:06:51 am
After using it for a while have you noticed if it sags from the weight of the books? I think this would be a really cute idea for an open pantry in my kitchen, but I'd like to use glass jars and baskets for flour, rice, snacks, etc. How is it holding up?
Reply
Anne T.
2/2/2016 11:30:52 am
I want to do the same thing in my closet and use it as shelving space. do you think it would be sturdy if i stacked them 3 or 4 high and didnt secure each crate to the other? No toddlers pulling on it...just me putting in and pulling clothes out. Thanks!
Reply
Jim Lews
4/11/2016 05:34:39 pm
What did you use to secure the stacked crates to the wall, to avoid toppling?
Reply
Laura
9/15/2016 08:10:00 pm
Walmart carrie's those crates I believe in two different sizes.
Reply
Katherine Carroll
9/17/2016 09:20:13 pm
I just saw a huge display of these tonight at Walmart, can't remember the price. This is fantastic. I plan on using these in my daughter's room for a bookcase and a second one for a window seat she has been begging for. I might even use one in my room. Thanks!
Reply
2/1/2022 02:14:53 am
What an exquisite article! Your post is very helpful right now. Thank you for sharing this informative one.
Reply
12/19/2023 08:43:27 pm
Experience the ultimate pleasure with high-profile call girls available 24/7. Our attractive Greater Noida escorts Service ensures a delightful time with Russian Escorts Greater Noida and VIP models in Greater Noida. Call 9899869190 now!! Visit here for more information:-https://delhicallgirlservice.in/greater-noida-escorts.html
Reply
Leave a Reply. |
My new book is out! Click to learn more about it.Hello thereI'm Julia Soplop, writer and photographer. I believe there is something profound in bearing witness to moments of joy and pain in others’ lives. My husband, three girls and I live outside of Chapel Hill, NC. You can read more about me here.
Snag my new photo curriculum for kids!Categories
All
Popular posts |

